
Guide: How to add text over an image like a pro
If you’re eager to start adding text over your images right now for social media, your business or even just for fun, hit the link below to start using the Desygner web app!
We also have Desygner mobile apps for ios and android users so be sure to check that out on the app store or play store if you’re constantly on the go.
So how do you actually add the text you might be wondering?
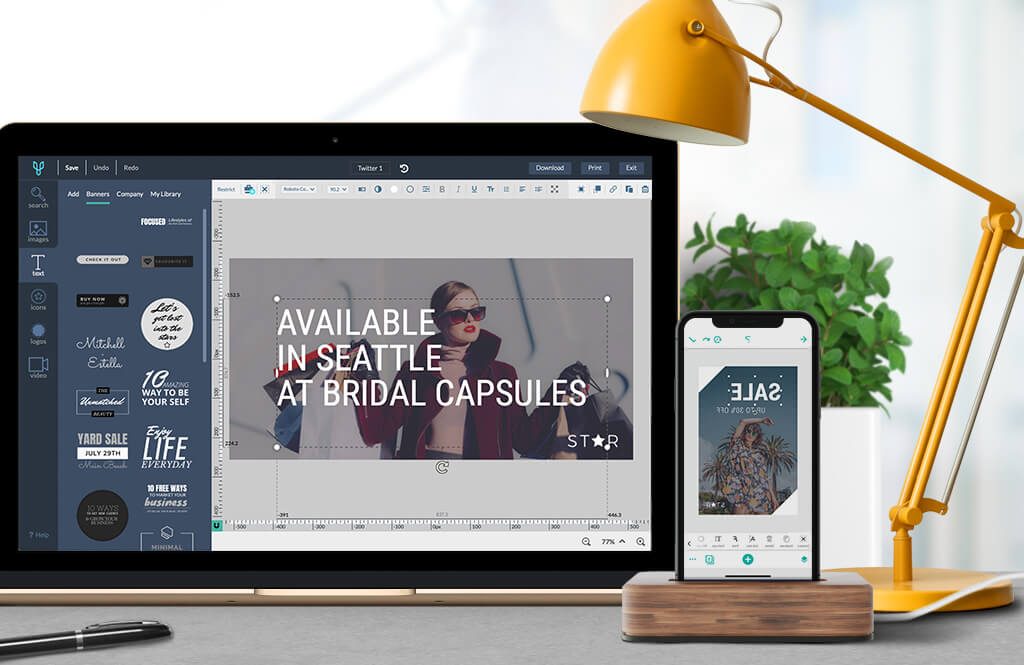
Firstly, sign in to the Desygner app and start with an image template. Select the images tab on the left and from here you can search from thousands of free stock images or upload your own simply by clicking on the ‘add’ button.
Next is adding the text. Again click the ‘Text’ tab on the left toolbar below the ‘images’ tab you are on currently, and simply select the type of text you would like. Click the text box to edit your text inside and resize it using the four corners.

There are more options to play with along the top toolbar to really give your text a unique look. Here you can change the font, colour, text size, stroke colour etc, simply click on the text and the toolbar will appear above your canvas.
Let’s get down to the details
Read the guide below if you want to know exactly how the pros do it and get real designer tips and tricks. So let’s get into the details of what makes an image with text look professional and eye-catching and how you could do it in under 5 minutes!
- Choose your photo carefully.
- Select the type of text, font or typeface to use.
- Match the text with the photo.
We’re currently experiencing a big Digital Boom and adding text over images is a very powerful tool on social media.
Online communication is more visual than verbal, which means: images sell!

All of us use our cell phones for multiple tasks: to work, learn, be entertained or search for inspiration. So, adding text over images for your social media channels is a great way to reach your marketing goals!
These powerful images will help you improve your social media reach. At Desygner, we want to help you achieve this with these simple steps.
How do you choose images?
- Choose high-quality and copyright-free photos.
- Add strategic spacing for your text.
- Consider the message you want to convey.
To professionally add text over an image, the first thing we’ll need is good photos! That’s right, good photos!
Not all photos are good and not all good photos will suit our purposes.
So, if we want to add text over an image like this, we’ll have to overlay content, which means we’ll have to choose our photos carefully.
Use High Quality Images
There is a myriad of image banks where you can easily download high-res photos. To add text over an image with striking results, we’ll need high-quality photos.
This is a key factor if we want our designs to look professional.
With Desygner’s integrated image search engine, we won’t have this problem, since it’s got everything we need.
With our search engine, you’ll find: High-Quality Photographs and best of all, they’re copyright-free!
Tip: Two of my favorite free image banks for finding thousands of professional photos on any topic you want is Photodexia and Unplash.
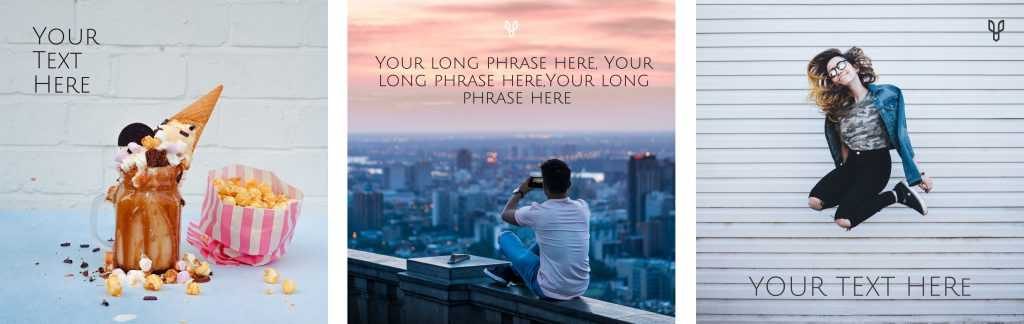
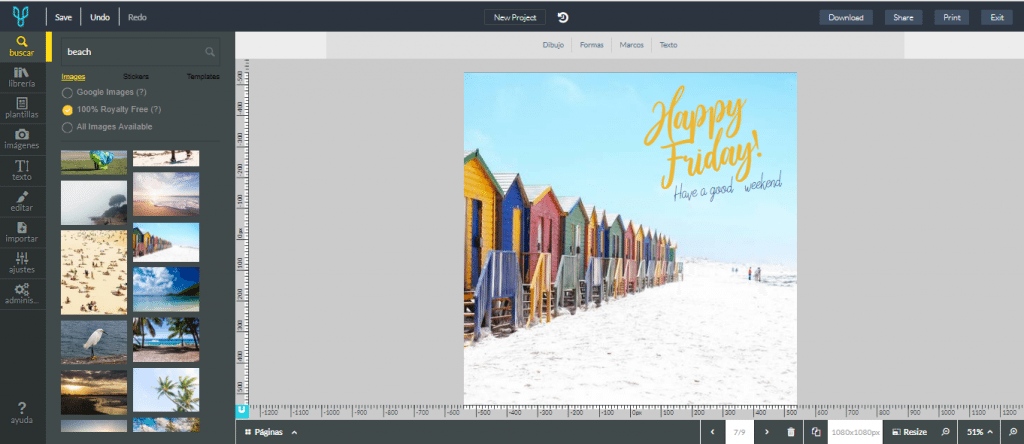
Strategic spacing in your photos
Whatever idea you have in mind for adding text over images, choosing photos with strategic spacing to fit our text is very important!
If you want to add a motivational quote, a simple Happy Monday, or a special offer, etc. you’ll need specific spacing. Not just any photo will do.
Depending on whether you have a very long phrase or one with a few words, you’ll need different photos, which is why you’ll have to choose the perfect photo for your idea from the wide range of options that Desygner’s search engine offers.
Let’s look at a few examples with the following image:
Your image reflects what you want to convey
There are thousands of images of all kinds: advertising, motivational, humorous, landscapes, etc. First, you have to ask yourself:
- What do I want to convey?
- What’s my goal? What do I want to accomplish with it?
Once you’ve got an answer:
Choose a photo that reflects what you want to convey, so you can add the text later.
For example, if you have a travel-related business, your photos could be landscapes, people travelling, food…
Remember that it’s not enough to add great quotes to your photos to make an impression on your followers or customers. You have to accompany them with eye-catching photos.

How do you choose fonts?
- Know your goal.
- Decide on the number of different fonts.
Combining different fonts isn’t a simple task. Sometimes combining several types of fonts to reach the goal you have in mind can cause more than just a headache.
Typeface or different types of fonts have personality and we have to match them in such a way so they convey the message we want to send to the person looking at the image.
Goals
As I mentioned earlier, fonts have a personality, which is why it’s important to know your goals and what you want to convey.
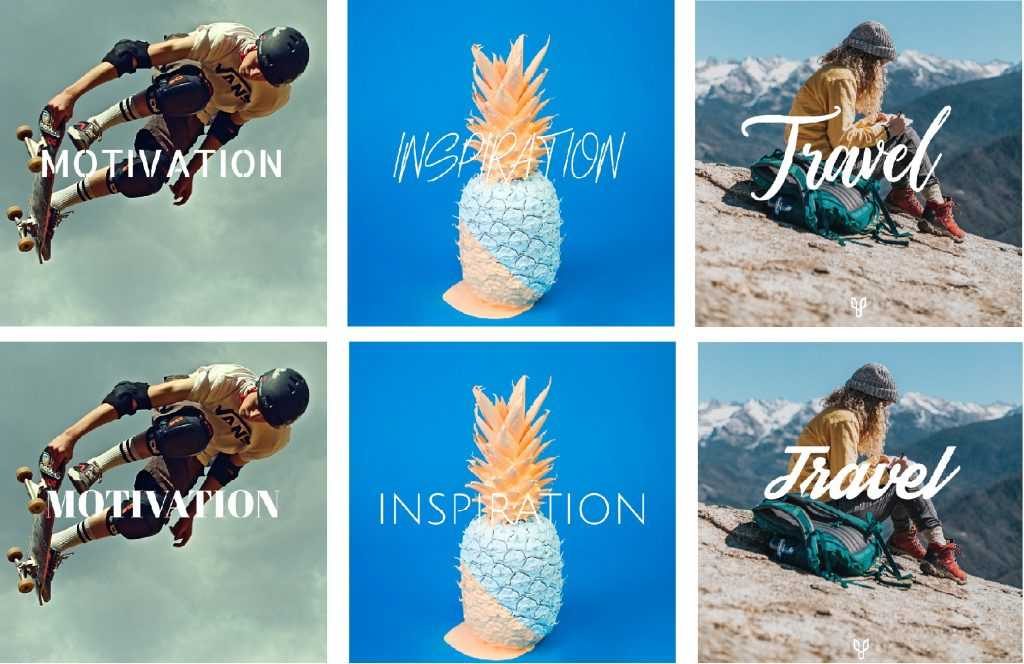
Let’s look at a clear example where you can see what I mean by “personality.”
You might also be interested in: How to create professional posters for your party or event
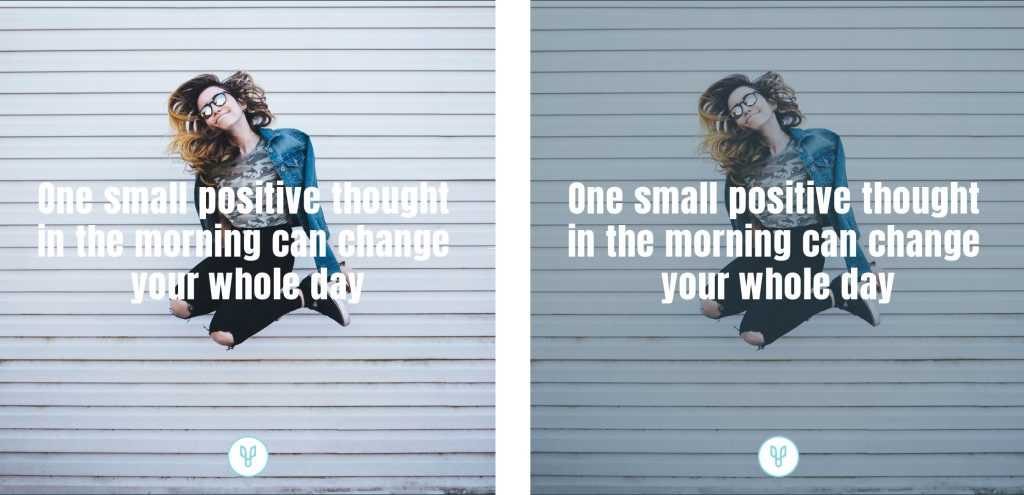
Although they’re the same images, the text completely changes them. Some of the images are more professional than others, some more serious or more fun.
For example, for the images with “motivation,” we can see that these images don’t motivate you as much as the one in section #3 above (Your image reflects what you want to convey):
That’s because the font used in the first image is thicker and steadier, showing greater strength.
If the font conveys strength and the word is “motivation,” we have an excellent combination.
I think very general categories for everybody getting started with design or for those who would like to create professional content and need to add text over an image for their brand, would be:

Watch out, careful with the daring fonts! They’re not easy to use and, above all, forget about using them for very long texts or with content-loaded images.
Important! If you’re not good with fonts but you want your design to look as professional and simple as possible, an elegant font like Helvetica is a good choice: it always looks nice.
What’s that? You don’t know what type of font Helvetica is?
You’ll find this typeface on every corner of the city, in most magazines you read, on the internet and especially in ads or brand logos.

We can say this is the most used typeface worldwide! If you’re interested in learning more about it, I recommend this article: Helvetica: one font to rule them all
Number of fonts
Use up to 3 fonts!
Using lots of fonts isn’t an easy task and it can create clutter, chaos and reading difficulty. Try out 2 or 3 fonts maximum and you’ll save yourself a serious headache.
Using different fonts is now very trendy for motivational posters with positive quotes, but be careful. They’re not easy to make! Matching the font, position and colors is no simple task.
In this example, you can see how using different fonts can interfere with the design:

Since we’re talking about fonts, you can take a look at this article where you’ll find a guide about Typography
Design Kit: A Guide For Beginners In Typography
An easy way to start adding text over images is:
Using the same font or fonts from the same family to then create good layout and contrast. Play with different thickness and create a unified layout with your texts.
Once you’ve got this, you can change some of your words to different fonts and see how it goes.
If after experimenting, you’re satisfied with your creation, try to change the background photo a few times. You’ll see how it looks with other photos, colors, etc.
This will help you experiment and even change the color or layout of your text to adapt it to that new image.
Example of image changes:

Once you’ve got your photo and text selected: It’s time to add striking text over images.
Matching photo and text:
- Contrast between your fonts: bold for titles and “light” for descriptions.
- Space between the image and the text: look for cleanliness in the image. Try to keep the same sized margin between them.
- The color of your text matches your photo: For this, you can use the color picker in the editor.
- Contrast between Image + Text: sometimes you change the color of your text over and over again, but you still think it looks bad. In some cases, this is because of the contrast between the text and the background image. To solve this, you only have to play with the background transparency.
How do I change the contrast between the Text and the Image?:
- Choose a background color that works with your image.
- Place it over the background photo.
- Increase the image’s transparency: This means that your image will be somewhat transparent, letting the background color show through, thus giving more contrast to your text.

A good match between elements (Image + Text) is what will make your images look professional and influence your followers to get more views, likes, publicity for your product, or who knows! Just send that invitation 🙂
Here’s an example so you can see the difference between the same image but with different contrast:
I hope this article has helped you add text over images for your social media channels, whether because you like it or because you need to promote your business, or whatever! They’re great!
As always, leave us a comment! If you’re interested in a specific tutorial, don’t hesitate to write to us and we’ll help you out in our upcoming articles.


How do I change the text size?
Hi Brandon
Thanks for your question. It is really simple as soon as you select the text you will see 4 white points appear on the corners of the text box. Click and drag these points to manually size the text. Otherwise, you can also just click on the text box and on the above toolbar you can change the font, text size and colour to preset values. Hope this helps!
How do I create an overlay template that I can store in the app and use over and over for branding?
Hi Mikaela,
Thanks for your question. You can add placeholders to the templates or your created designs which you can then easily drag-and-drop images into and change colours to suit your branding.
I hope this helps!